Using Selection Sheet Manager
Selection Sheet manager provides a graphical interface to help your customers make decisions in your showroom. It allows you to enter information concerning your customers interests and preferences as they browse through your showroom. The ease and functionality of this product makes it very easy to replace a filing cabinet type logging system with a web-based one.
Searching for Selection Sheets
ODS (Output Distribution System) Tab
Pricing in Selection Sheet Manager
Ordering Items by Serial Number in Selection Sheet Manager
Adding Files and Images to a Selection Sheet
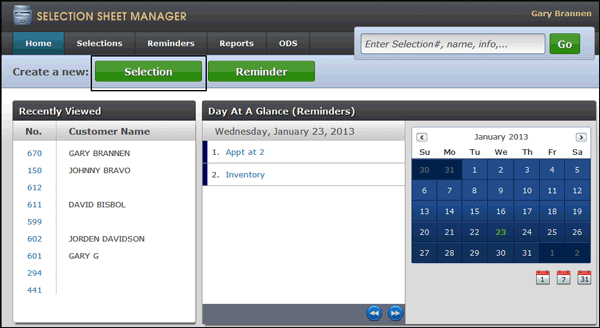
The Home tab presents you with a quick history and your day's appointments.
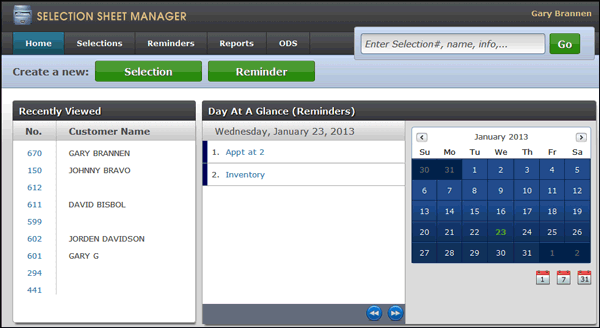
The Reminders under Day at a Glance are inserted into the system using either the Reminders tab or the Reminder button. Use the Reminders button for today's events and the Reminders tab for future events.
Editing Selection Sheets
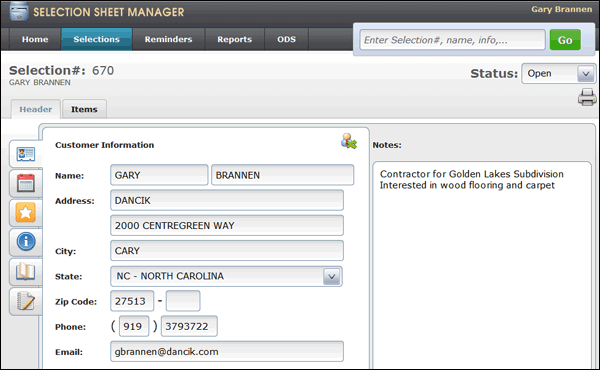
- Click on an existing selection sheet to access the Header portion of the selection sheet.
- Select a Status. The Finalize and Close statuses perform similar functions. Finalize shuts off all functions (i.e., adding items or references) except for the ability to place the order. Whereas, Close deactivates all functions to include placing an order.
- Select a selection sheet and use the following areas to update or add information:
- The customer information is not editable on Billto Accounts. The fields are not accessible.
- The default buyer's account number from the Billto Account is imported into the References section of the Header. If the billto account does not have a default buyers account, the field is left blank.
- Accounts are not duplicated in either the green screen or Navigator.
- Virtual accounts are not included on Green Screen customer searches.
- Virtual accounts are not displayed in Navigator.
- On the right-hand side of the screen, you can enter Notes about the order. These notes are displayed on the order and can be seen by the customer. Click the notepad icon to enter notes that the customer cannot see.
Use the Lost status to record and track lost orders. An order may be considered "lost" for many reasons. For example: you do not carry the product the customer is requesting, the price was too high, or the item was not available and back order time was too long.
The display of the Finalize, Close and Lost buttons is controlled by global/user settings.
| Icon/Area | Description |

Customer Information |
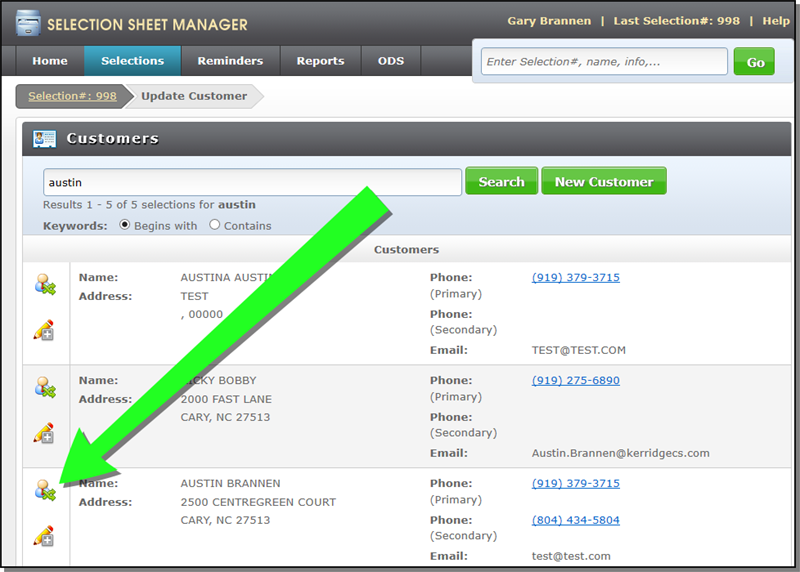
-Edit the existing customer information or switch customers. The Alternate Address section lets you enter a different address from the customer's billing address. The Alternate Address is only related to the printed selection sheet. It is not passed to or saved by Selection Sheet Manager. The Alternate address prints along side the Customer address when the selection sheet is printed. The title "Alternate Address" can be changed via a setting on screen 3 of the Global Settings (SSM 1) to another title that better suits your company's terminology. There is a Global/User setting, Include alternate address, that adds the Alternate Address tab to Step 2 of the checkout process and allows the alternate address to be used on printed selection sheets. Using Billto Accounts In 2016, an enhancement, (Spec 4835) was implemented that allowed SSM to use Billto Files. When Selection Sheet Manager was originally designed, it was based off the use of Retail Customer Accounts. This enhancement allowed SSM to use Billto Accounts as well. When a Billto account is used, a "virtual" retail account is created. This virtual retail account is linked to its associated bill account. Essentially the company and account (BCO# BACCT#) is copied over from the Billto account and assigned a Retail ID (RCID#). Billto Accounts are handled essentially the same as retail files in SSM. However there are a few differences: Affects on other Parts of the System This functionality requires a one time population of the Retail File with BillTo data. This upload has to be requested from and done by Kerridge. For more information, click here. Swapping CustomersClick the Customer Swap icon (
After you search on or create a customer, click the
|

Dates |
Add important dates, such as when samples are due back in, installation, and due dates. Date types (i.e. Install date or Due date) are added and maintained via menu option SSM 14- Work with Dates on the iSeries Selection Sheet Manager menu. Comment fields are available to the right of each scheduled appointment. These 13 character fields can be used to enter information about the appointment. These comments have to be activated via the setting Enable Additional Date Information on screen 3 of the global/user settings. For more information, refer to, Screen_3 of the Global Settings. |

References |
Use this area to enter information about who referred this customer to you. References are assigned to a "Type" using the Work with References option on the SSM menu (menu option SSM 12). |

Job Information |
This area allows you to include additional information such as the type of construction (i.e. new or remodeling), how your customers heard about your business, the development, plan ID, and lot number. This information is added, deleted and maintained via Work with Detail Information (SSM 13) on the green screen Selection Sheet Manager menu. The Global/User setting Allow Web-Maintenance of Job Information grants users permission to edit the Job Information on a Selection Sheet. For more information on this setting, click here. |

Log |
Opens the selection log which shows all activity such as when the selection was created, every time it is accessed, or when items are added or deleted. |

Notes |
The notes (up to 256 characters) entered here cannot be seen by the customer. Each note is time stamped. URL links can also be added |
Creating Selection Sheets
To create a Selection Sheet, you need to add information to the Header and then add the items.
- Click the Selection button on the Home tab.
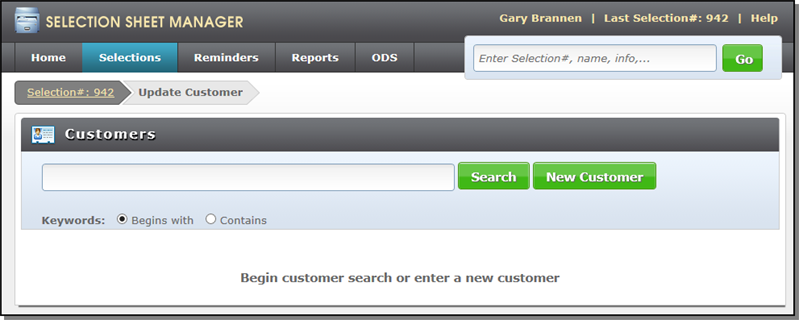
- Search for an existing customer or add a new one. The customer search and creation procedures access the Retail Customer File.
- First and Last Names match the corresponding fields
- Area Code, Phone Number, and first letter of Last Name match the corresponding fields
- First 4 letters of Last Name, first 3 characters of Address 1, and first 3 letters of City match the corresponding fields.
- Click the
 to edit the customer's information.
 - Click the
 icon to add a customer to a new selection sheet. Check the Header information and make changes as needed.
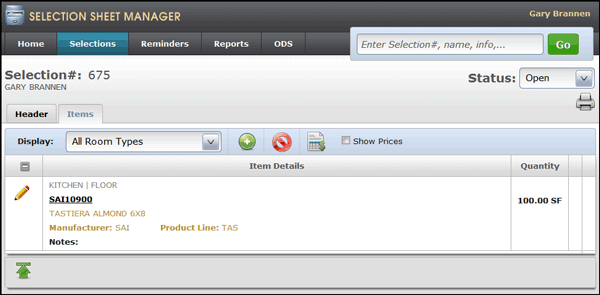
 - Click Items to add products to the selection sheet.
- Click the Add Selection Item icon
 to begin adding items to the selection sheet.
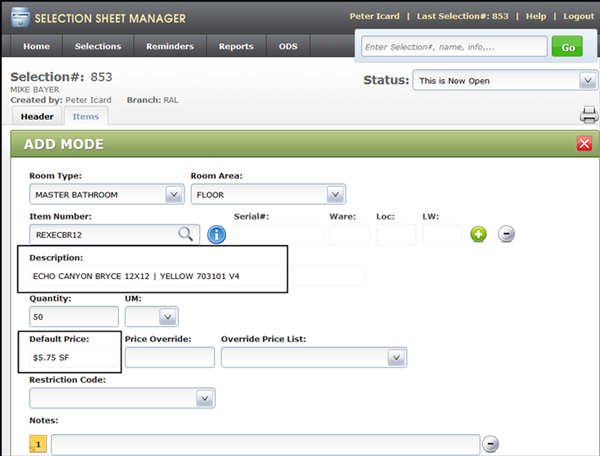
 - This screen can be filled in with great detail if the customer already knows the exact products he/she wants. On the other hand, if the customer is not sure about their needs or wants more time to decide, you can enter a limited amount of information.
- The information entered on this window is added to the selection sheet. It consists of the following fields:
- Room Type - (i.e., bathroom, dining room, living room). Room Types can be added, deleted or edited via Work with Room Types and Room Areas (SSM 10 and SSM 11).
- Room Area - Select a surface, such as counter-top or wall, where the product will be used. Room Areas can be added, deleted or edited via Work with Room Types and Room Areas (SSM 10 and SSM 11).
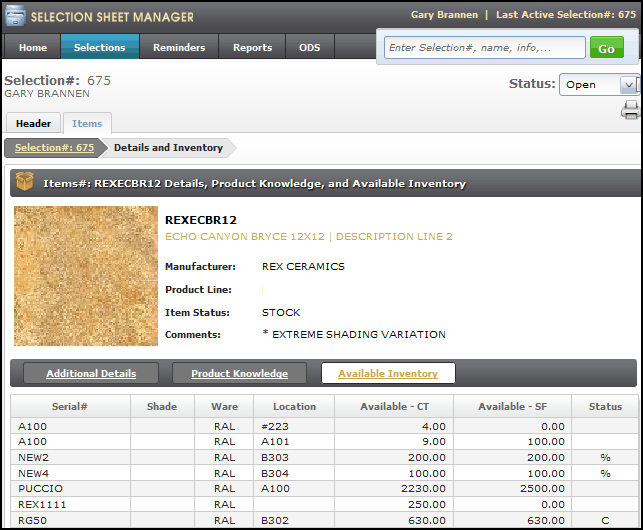
- Item Number - You can search for items by clicking the search icon SSM12.png When a valid item is entered, click SSM13.png to display the Details and Inventory window. The Details and Inventory window provides additional details and inventory levels on the item. Images can be added to the item via the menu option Work with Images (SSM 25) on the Selection Sheet menu.
- The default price for the item is in the native unit of measure for the current buying account.
- If a Buyer Acct# has been entered on the References tab of the Selection use that account number to derive the default price and native unit of measure.
- If no Buyer Acct# has been entered use the user's default Company number and default Account number, found in SSM 3 User Settings File Maintenance, to derive the default price and native unit of measure.
- If an item has a cut price display the cut price
- If an item does not have a cut price display the roll price.
- Quantity and UM - Enter the quantity (required) and unit of measure (optional). This entry converts to a message line when the order is processed.
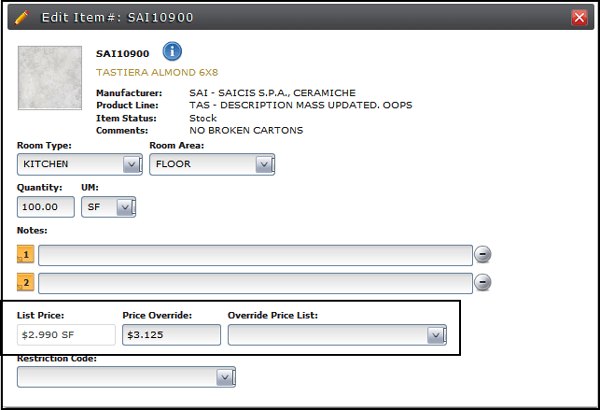
- Price Override - If a price is entered here, it overrides the pricing information contained within the Price List.
- Override Price List - Unless an established price list is entered here, the system uses the pricing configured for the active account. Price lists are created on the core system via the Price File (FIL 9). Each price list is represented by a two-character price list number.
- Restriction Code - Presents several pricing options and restrictions based on the product packaging (e.g., roll, cut, carton, pallet pricing, etc.). The restriction codes are created in the Core System via menu option FIL 19 - Classification Codes File. The global setting, Omit Restriction Code in Item Add/Edit Mode, allows you to not display the restriction code drop down menu when adding a new selection sheet or editing an existing one. This setting is located on Screen_3 of the global settings.
- Click Add. The newly added item is displayed at the bottom of the window.
- 10. When you are finished adding items, close out the Add Mode window by clicking "X" in the right hand corner. This returns you to the initial Item Header.
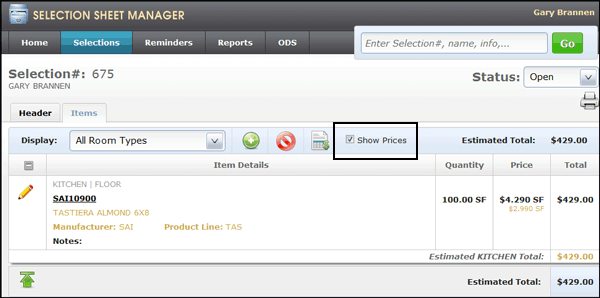
- Activate the Show Prices option to include pricing information. The default is to hide pricing information.
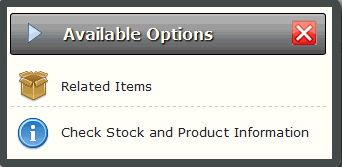
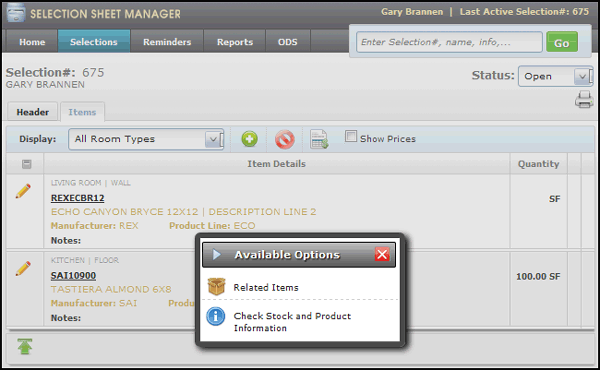
- Click the item to display the Available Options window.
-
Check Stock and Product Information - Displays the Item Details and Inventory window where you can access additional information about the item and inventory levels.
- Related Items - This option displays the items that relate to, compliment, or "go with" the item. We refer to the items that relate to an item as its "Bill of Materials". A kit is a special item that does not exist on it own, but is comprised of a set of other items. Bills Of Materials can be set up by Product Line and Price Class level (as well as at an item level).
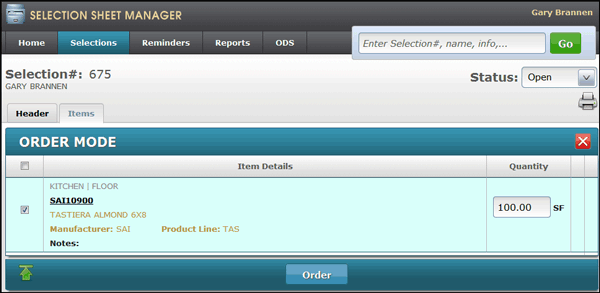
- To order the items, click
 . The order detail screen appears showing the items on the selection sheet. Select the items you want to place an order for.
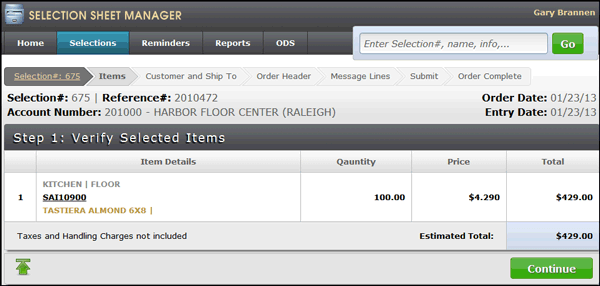
 - Click Order to create a new order for the items on the selection sheet. At this point, a system generated reference number is assigned to the order.
- Click Continue to proceed to the Customer and Shipto window.
- The default address comes from the Retail File.
- Select Manual Override from the drop down menu and manually enter the address.
- Select any of the shipto accounts contained in the drop down menu. The addresses contained in the drop down menu are tied to the account via the Shipto File.
- Click Retail Account to use the address set-up in the Retail File. If you are already working with a retail account the default address is the retail account.
- Use the Buyer's Account for commercial type jobs. Retail users are tied to a buyer through the Reference tab on the Header window.
- Use the Alternate Address to use a manually entered alternate shipto address to be used on a selection sheet in the place of the established shipto addresses. Alternate Addresses can be manually entered in the Customer Information section of a Selection Sheet.
- Click Continue to access the order header. The order header displays general information about the customer and the order.
- OT - Our TruckAir
- BE - Best way
- CC - Common Carrier
- RW - Roadway
- WC - Will call
- Holds - enter H. - holds are unconfirmed orders. They are entered and processed the same as regular orders, except that they are notated on screens and reports as status H.
- Claims/Credits/Returns - enter C. Code C causes Credit/Return Authorization to print on pick lists and order acknowledgements. Whenever a C is entered as the credit type, the system automatically checks for duplicate credits entered against the same order or invoice number. A potential duplicate credit is defined as any other credit memo cross referenced to the same original invoice or order number as the credit memo you are beginning to enter.
- Future/Forward Orders - enter F. This code designates that the order is for stock that has not yet arrived. When entering code F, you should also enter an order date that coincides with, or is just after the future arrival date of the stock.
- Quotations - enter Q. . When the quote is ready to be converted into an order, remove the Q and process the order. If the Q is not removed, when you get to the cash register screen to process the order you will receive an error message.
- Unusual Sales - Enter U or V. This flags certain sales to exclude them from the usage figures on the reorder reports. Use this feature to eliminate non-repeat sales that could distort your usage figures.
- 1-Fill/Kill - At the time the order is shipped or invoiced, any unshipped or uninvoiced lines on the order are cancelled. A fill/kill order is an order that can only have a single shipment and invoice generated against it. After the first shipment, all unfilled lines remaining on the order are automatically cancelled by the invoice update process. The customer will reorder the killed items as needed.
- 2-Back order - At the time the order is shipped or invoiced, any unshipped or uninvoiced lines on the order remain at their current status.
- 3-Fill/Kill and Notify - Same effect as code 1, except the customer must be notified of what is being cancelled.
- 4 - Back order with new PO - Same effect as code 1, except the customer must be contacted for a new purchase order number to be used for remaining lines. A new order will be entered for remaining lines.
- 5- Must Ship Complete - All lines on this order must ship together. At the time of invoicing, unbilled lines (which should not occur) are left open. This OH code automatically withholds back order pick lists and bar code picking labels from printing until all back ordered items within the order are filled. When back orders are filled, the system checks to see if the order contains other back ordered items that are not yet filled. If the order has order handling code 5 (must ship complete), the pick list and bar code pick labels do not print. If the order has no more unfilled back ordered items, then the pick list or bar code labels will print.
- 6-Rush order/compensated - The order must be shipped as soon as possible. The customer is paying an additional rush delivery fee. The order is rushed at the customer's request. This code is used primarily for EDI in order to identify special circumstances to a trading partner. At the time of billing, unbilled lines are left open.
- 7-Rush order/uncompensated - The order must be shipped as soon as possible. The customer is not paying an additional rush delivery fee. The order is being rushed for reasons other than the customer's request. This code is used primarily for EDI in order to identify special circumstances to a trading partner. At the time of billing, unbilled lines are left open.
- Truck routes are set-up in the Route File (DEL 1).
- Run Numbers are a subset of the original route. They can be used to define multiple schedules within a single route, such as Monday only versus Monday and Wednesday. It is an extension of the original route code.
- Stops are the next level of a truck route. They provide a more detailed stop list, generally used as a reference tool when fine tuning a route on a given day.
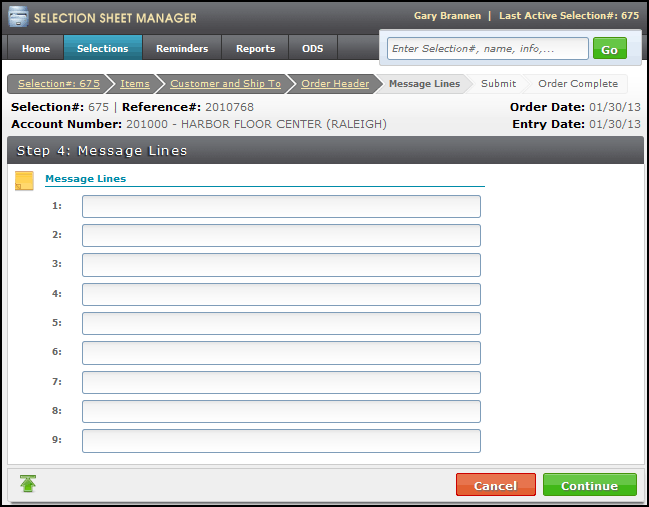
- Click Continue to access the Messages window.
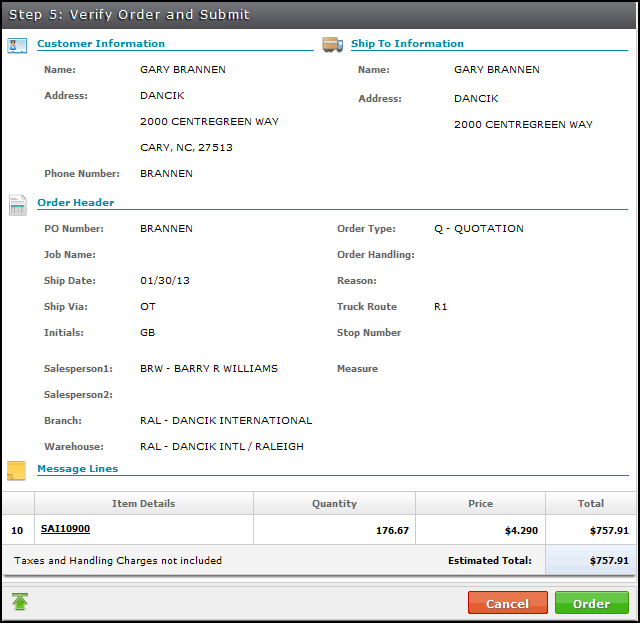
- Click Continue to verify and submit the order.
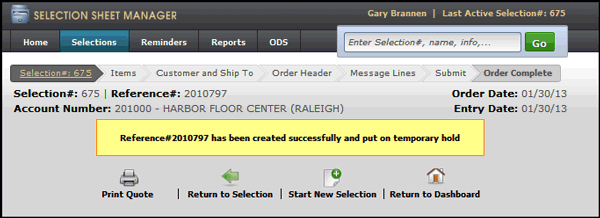
- Review the order information and then click Order. The order is placed into a temporary hold status.
- To finish processing the order, access it through the Kerridge System on the iSeries (green screen) or from Navigator's Order Management.
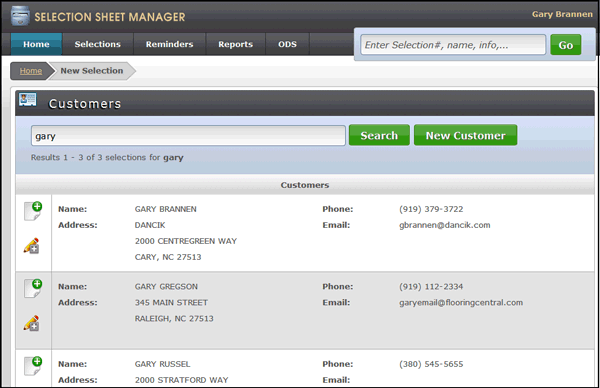
If you enter a customer name and click New Customer, the system checks the Retail Customer file for duplicates. If there are duplicates, you can select one of them or continue with the new customer. Here is what the duplicate customer functionality looks at in the Retail Customer File to determine if the customer is a duplicate:
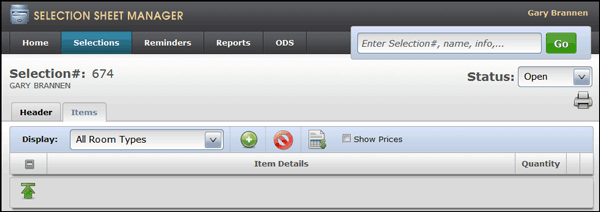
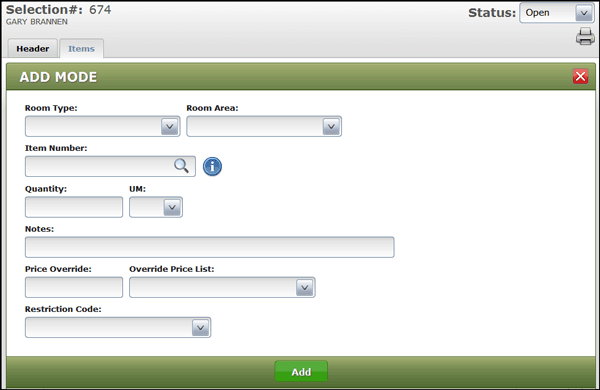
When an Item is entered, its description and price information appear.
For Rolled Goods:
There are several features and links available from the Item Header.
For more information on Pricing, refer to Pricing in Selection Sheet Manager.
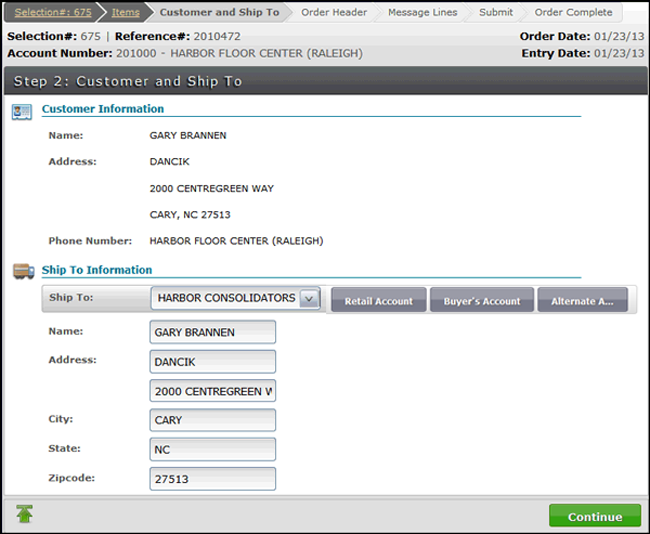
You have several options for the Shipto address:
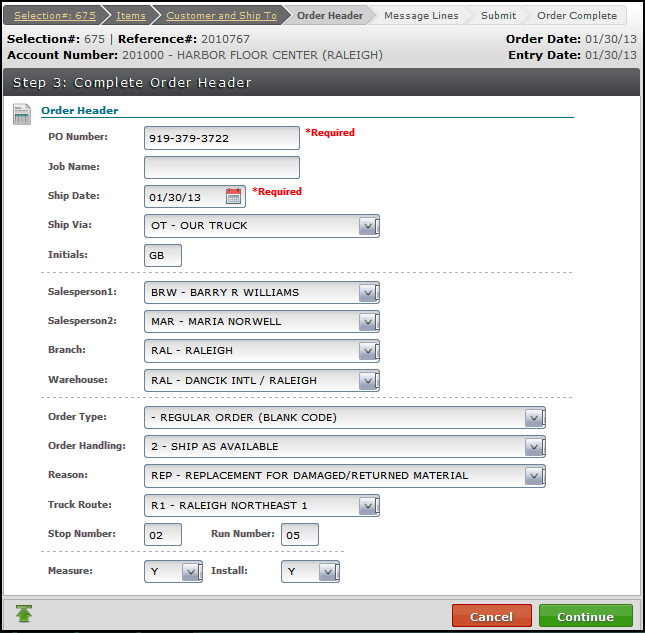
| Field Name | Description/Instructions |
| PO Number | Enter the customer's purchase order number or job number for the order. If the customer does not have a purchase order number, you should enter information indicating how, when, or by whom the order was placed. This number, code, or name can be useful in tracking the order. Enter numbers or letters, or both. You can search for orders by this field after the order is processed. This can be very helpful because customers often refer to this number when making inquiries about an order. If you have multiple references which need to be entered, use this field for the reference that is most important or most frequently referred to. Then, use the Job Name field to enter other references. This field is mandatory. For cash sales customers that usually do not have a purchase order, we recommend entering their last name or phone number. One of the options to search open orders is purchase orders, you can search for all purchase order numbers by last name. |
| Job Name |
Type in the job name or any additional information regarding the order. If a customer has special job or contract pricing. This field prints directly underneath the customer purchase order number on all documents. Entering a job name can help in tracking orders and in reporting. |
| Ship Date | Enter the date on which the order is required to be shipped or picked up. Today's date automatically appears as the default. It is especially important for this date to be accurate if you are shipping or delivering to the customer. All truck routing programs utilize this date. |
| Ship Via |
Select the code representing the method of shipping for the order. Ship via codes are defined and can be displayed by the Classification Codes File Maintenance program. Your company can define and maintain its own set of codes. The following are examples of some of the Ship Via codes that can be set up: Ship Via codes can be made mandatory via the System Wide Setting "Options for Ship Via Codes". Also included in the setting is an option to validate the ship via code against the Classifications Codes File. If these settings are activated, and a ship via code is not entered or an invalid one is used the error message "Invalid Ship Via Code" appears. |
| Init | Enter your initials or the initials of the person who took the order. The default is the operator ID as entered in the Control User program. The operator's initials can also be entered in the Control Panel for this terminal. User control overrides Control Panel. You may leave or override the default. |
| Salesperson | The primary and secondary salesperson assigned to this customer automatically display. If salespeople are assigned based upon the product, then this field is blank. |
| Branch |
The default branch, as determined in the Control Panel, is automatically entered. The default in the Control Panel can be either your actual branch, or ALL if you are allowed to enter for multiple branches, or C* which causes the program to display the branch assigned to the customer for whom you are entering the order. In any case, this field completes automatically. The default can be changed only by authorized personnel. The branch code determines which branch gets sales credit for the order. Do not confuse the branch with the warehouse, which determines the location of the stock, or the point of shipment. The two codes do not have to be the same. |
| Warehouse# | The default for this field is the default warehouse assigned to the customer. You can override this default. Enter the warehouse from which the order is being delivered or picked up. |
| Order Type |
Order type codes can be user-defined or system defined. The user defined codes are informational only. Only the system generated codes: H, C, F, Q, U and V direct the system to perform an action described below. |
| Order Handling |
Order handling codes provide the default method of handling unless overridden. Sample order handling codes are shown below. |
| Reason | Order Reason Codes can be both system and user defined. They are meant to flag orders for special processing, primarily with regards to EDI. You can set up your own Order Reason Codes using the System Tables Program. |
|
Truck Route Stop Number Run Number |
These settings relate to delivery. |
|
Install Measure |
These fields are meant for companies that provide on-site installation and measurement services. These fields are only displayed if the Control Panel setting for Retail Environment is set to Y. If either of these fields is set to Y, Order Inquiry will automatically show the Installation and Measure status & dates. |
Any notes entered are carried over to the Kerridge Enterprise system.
Completing the order on the Kerridge System on the iSeries (green screen)
- Menu option ORD 1 or CUS 1
- Enter a "U" as the action code and the reference number from the selection sheet.
- Press Enter to access the order.
- From here the order can be processed. by pressing F7 and then selecting one of the processing options.
Completing the order from Navigator
- Access Order Management
- Enter the reference number and click Submit.
- The order detail window appears. Click Complete Order.
Enter your search parameters in the search box. Selection Sheets can be searched by several parameters including dates, customer names, and selection sheet numbers.
Press Enter or click Go to display the search results.
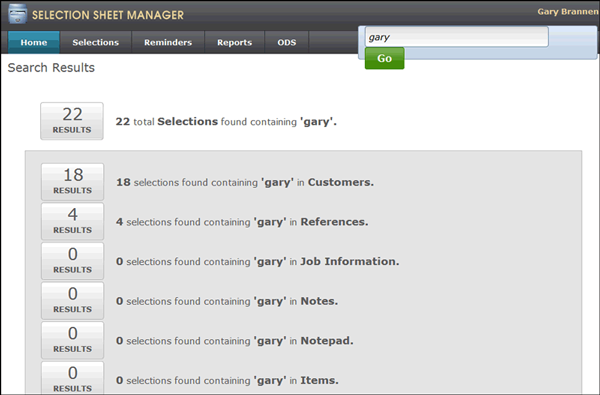
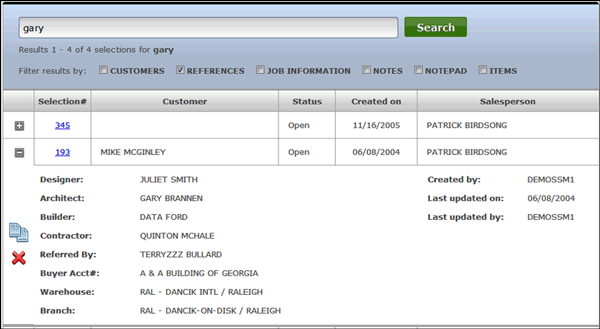
Selection Sheet Manager arranges the search results by area (i.e. Customers, References, Items). Click the Results button to display the search results for a specific area. In the example shown below, only the selection sheets with a reference to "Gary" are shown. You can expand the results displayed by including more of the filters.
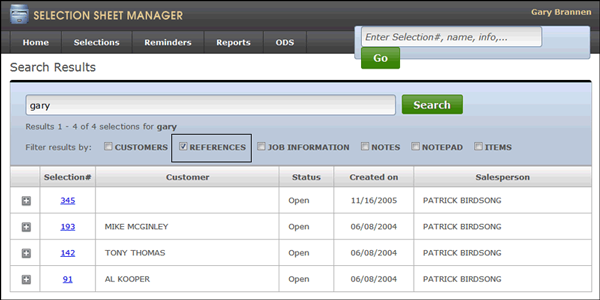
Click the "+" sign to the left of a Selection Sheet to view its details.
Use this screen to add calendar events or to annotate return customer visits or other important events.
If you have any events set-up for the current day, they appear as scheduled reminders.
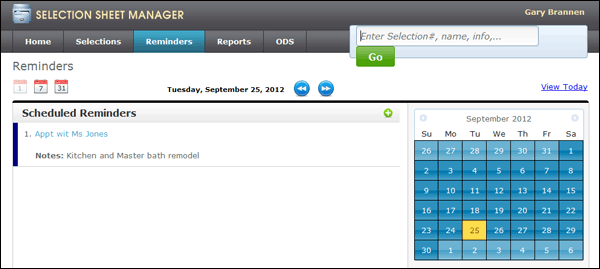
Automatic reminders can be triggered using the option Work_with_Dates_(SSM_14) in the Selection Sheet Manager menu.
This tab lists all the spreadsheets/reports that have been generated. The window that appears after clicking the ODS contains two report tabs.
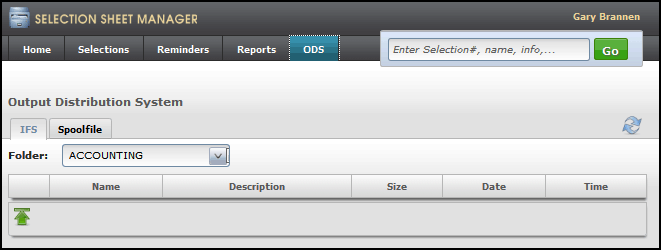
IFS Reports
The IFS (integrated file system) is a part of OS/400 (green screen) that supports stream input/output and storage management, similar to personal computer systems, while providing an integrating structure over all information stored in the AS/400.
These reports are based on filtered data that has been extracted into a spreadsheet.
1. Select the SSM folder to view your generated reports.
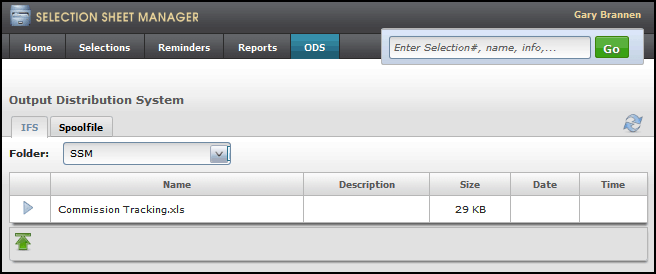
2. Click the right arrow, in the far left column, for the report you want to work with. Select one of the options.
- Open - Opens the report as a spreadsheet. It can then be viewed, manipulated, or printed as needed.
- Delete - Deletes the report from the IFS drive.
Spoolfile Reports
Includes all reports submitted via the system. If you run a report and it does not automatically appear under this tab, your report could be running behind a big report that takes some time to run. When submitted, the reports go into a queue and the first ones submitted are the first ones generated.
Note: On the iSeries, you can use the commands WRKSBMJOB or WRKUSRJOB to check on the status of print jobs.
If there are numerous reports on the spoolfile, performance could be hindered (i.e. it takes longer for the reports to display). A good practice is to do basic housekeeping on your spoolfiles, and to delete unwanted/unneeded spoolfiles. For the main reason that they take up unnecessary space on your system.
Click the option arrow, to the left of a report, and select one of the options.
- Open PDF or Text - opens spooled files in a PDF or text format. It can then be printed if needed.
- Delete - removes a spooled file.
- Release - releases a held spool file.
- Hold - prevents a spooled file from printing so it can be reviewed at a later date.
Notes:
- ## in the Job Name column means the report was generated from the web based reports application. If a workstation ID appears (i.e. XP, XT, XW), it means the report was generated on an iSeries machine.
- The Open status designates the report is still being generated. You might see this status for some of the bigger reports.
Selection Sheet Manager provides several options concerning item pricing.
Billto Pricing or List Pricing
If you choose to show prices, you might notice that two prices are displayed.
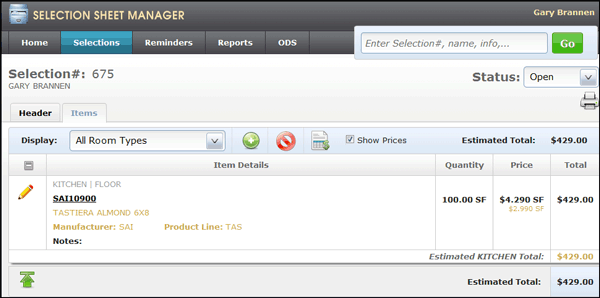
- The first item price, in this example 4.290, is the default pricing which comes from the default Billto account assigned to the customer.
- The second price, the yellow one (2.999), comes from the List Price assigned to the customer.
- If only one price is displayed, the default Billto Account and the default list price account are the same.
- Default Billto and Price Lost accounts are established on the first screen of User Settings (SSM 2).
- If you want to use the List Pricing, or any other price, you can override the default Billto price by clicking the edit icon (
 ) and entering an override price.
The Product Knowledge window is accessed by:
- clicking the
 when adding an item
 - by clicking on an existing item in a selection sheet and then selecting Check Stock and Product Information.
- The Check Stock and Product Information option - Presents all the information: Product Image, Available Inventory, and Product Knowledge in one place. This option lets you use product knowledge already in place on your core system. The information is branch specific. This means that if a user's default branch is Raleigh, the information in the Raleigh branch's Product Knowledge File is accessible to that user. It also goes into the core system to check inventory levels for specific items. As shown below, the results are presented by serial number and amount available.
Selection Sheet Manager can specify, down to the serial number level, order items.
This will also enable SSM to make selections against slab items (policy code P#).
Ordering Items by Serial Number
Set-up
Three Global/User settings control this functionality.
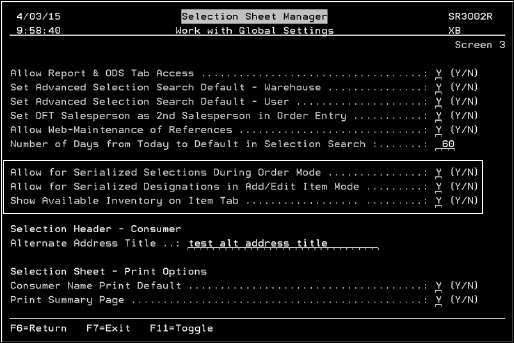
- Allow for serialized selections during order mode - If this is set to "N", serialized selections in SSM are not possible: neither when making the initial selection, nor when placing an order. If this option is set to "Y", SSM displays a field to specify a serial number.
- Allow for serialized designations in add/edit item mode - If set to a "Y", then this option will enable the ability to specify serial numbers during item add or item edit.
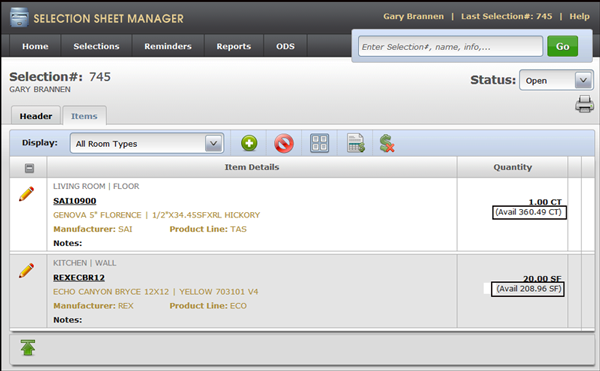
- Show available inventory on item tab - If this setting is set to a "Y", then under the quantity requested, we will show the available quantity of this item based on the user's warehouse settings.
Ordering Items by Serial Number
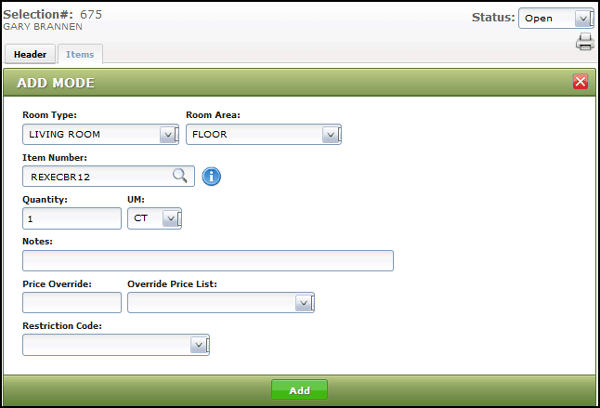
- Start a new Selection Sheet or select an existing one. In this example, we are going to start a new selection sheet. Follow these steps to get to the Add Mode window; where we will add serial numbered items to the selection sheet.
- On the Home tab, click Selection.
- Enter a customer on the Header tab.
- Click the Items tab.
- Click the Plus sign icon to display the Add Mode window.
- If an item that is coded as a serialized item (item code of "S" in the Item File) is entered, serial number fields display.
- Use the plus icon to the right of the fields to display the serial numbers available for the item number.
- Select a serial number to fill the order. The information is imported into the item addition window.
- Click Add to include the serialized item to the selection sheet. The information gets carried all the way through the order process and even onto the printed selection sheet.

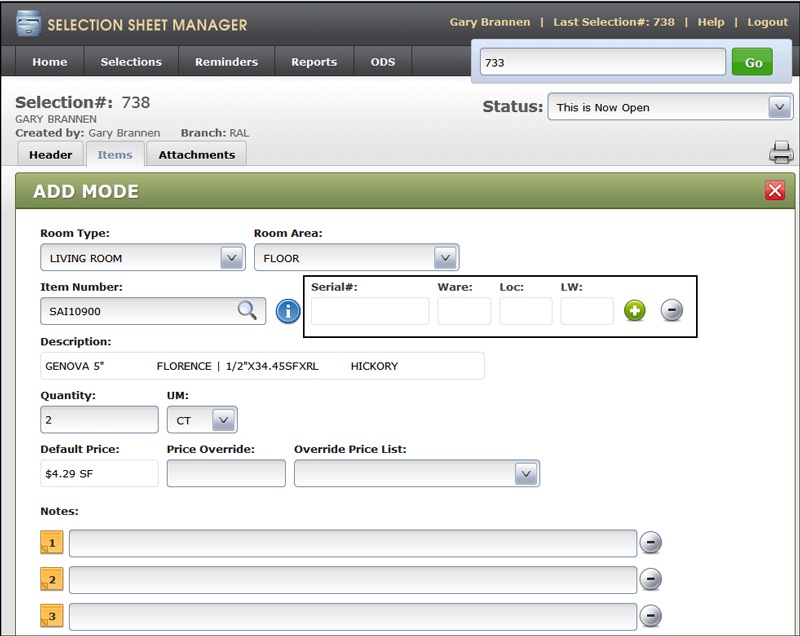
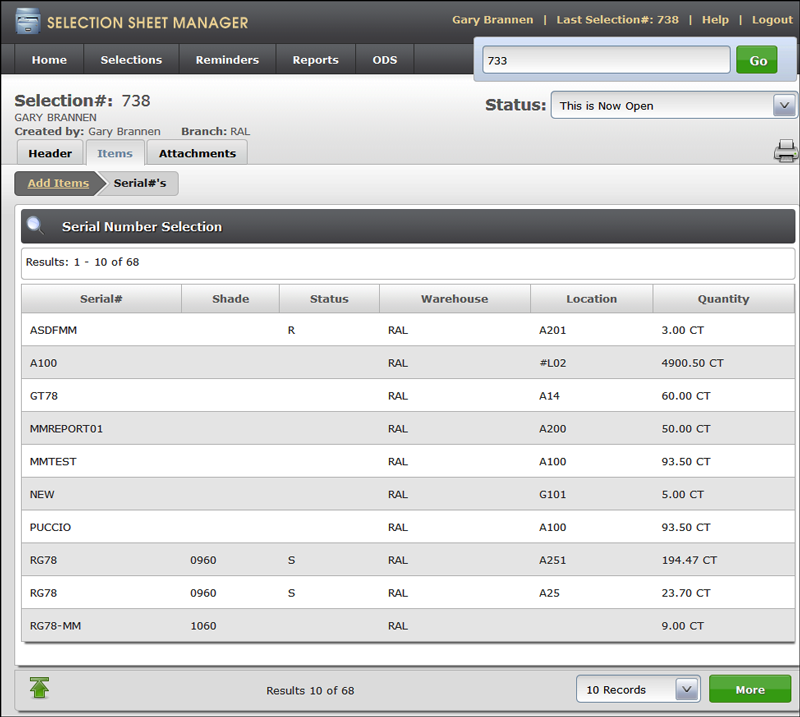
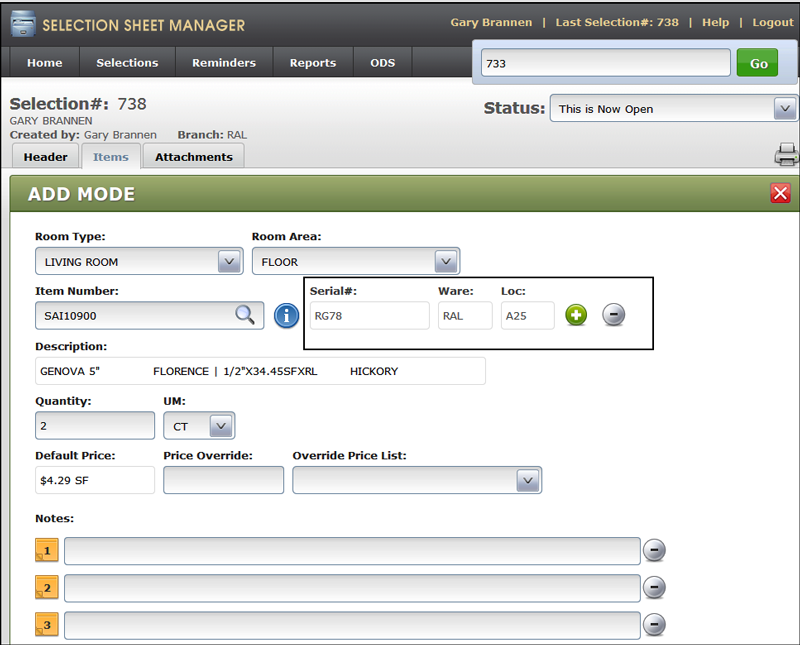
Slab items are created when P# is entered as the item component code in the Item File.
- On the Add Item window, enter a slab item number. The Serial number boxes appear.
- Click in one of the boxes to access the Serial Number Selection window.
- Enter a quantity in the far right hand box.
- Click Add Items to include the slab on the order and return to the Item Details window; where you can add more items or, as in this example, begin the order.
- Click the order icon (
 ) and select the items to include on the order.
 - Click Order at the bottom of the window to continue with the order process; notice the serial number information is displayed throughout the order process.
If you do not enter at least one serial number, you will receive a warning message when you try to order the slab.
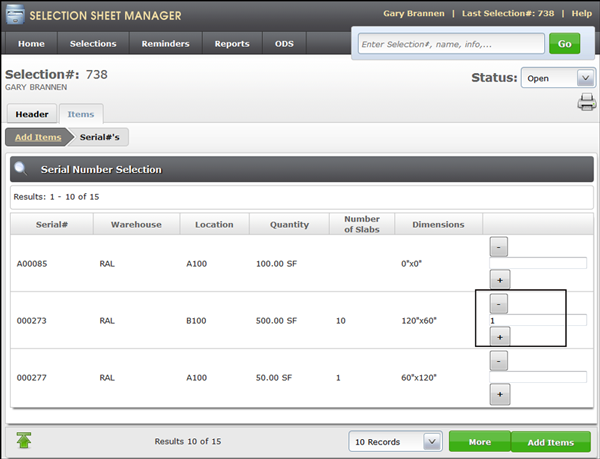
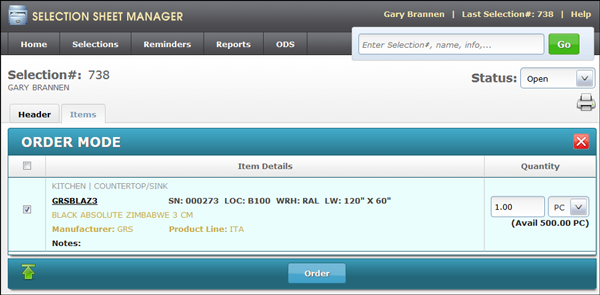
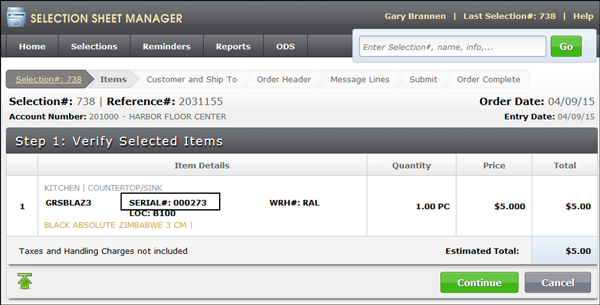
The serial number information is also included on the printed order.
The Print icon appears in the upper right hand corner when you are in an active Selection Sheet.
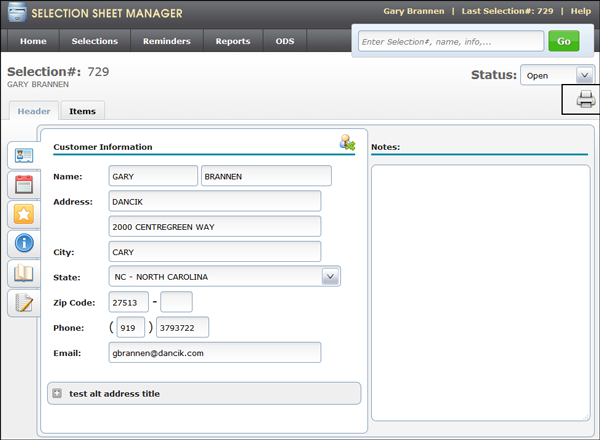
Click the Print icon to access the following print options.
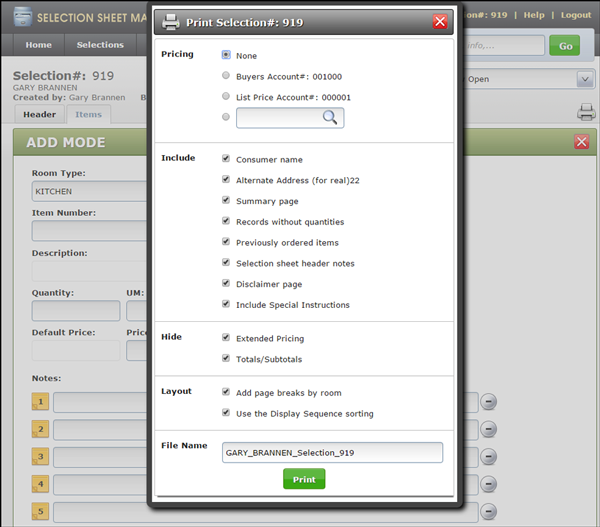
Notice that the user's name is automatically added to the File Name. This default entry can be edited, but by adding the user's name, selection sheets can be easier to identify.
If the setting Include Special Instructions is activated, Special Instructions, from the Item File, will print on SSM sheets. The Special instructions are added to the printed document, under the item.
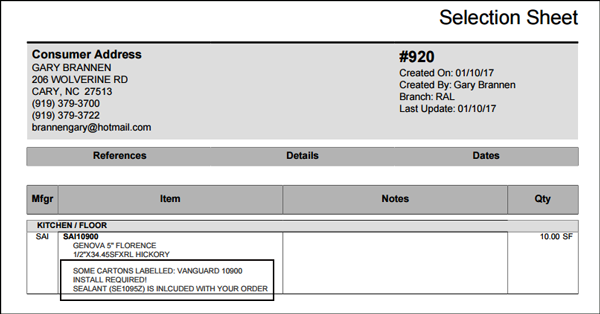
Path to the Special Instructions:
- Navigator: File Management>Item File>Update or create an item>Select Instructions from the Options.
- DES (green screen): FIL 2 - Item File>Update or create an item>F12 - Special Instructions.
Associated Files
The following green screen set-up options give you some control over what is included on a printed selection sheet:
- Work with References (SSM 12)
- Work with Detail Information (SSM 13)
Adding Attachments to a Selection Sheet
Including Attachments with Selection Sheets
Set-up
Activation
This functionality has to be activated via the setting Enable access to upload/manage attachment at the Global, Group and User level.

The setting Number of Days to store attachments for sheets unaccessed allows you to configure when the system will auto cleanup attachments from sheets that haven't been accessed. A NJ utility will take sheets that haven't been touched for longer than this setting, and delete attachments from the system from those selection sheets. The log of sheets that have been automatically purged in this manner can be seen via the SSM interface under Reports.
Adding Attachments to a Selection Sheet
If the functionality has been activated, an Attachment icon is displayed on the selection sheet items tab, as well as a new Attachments tab will appear. You can upload from using the icon on the items tab, or the same icon on the attachments tab.
Attachments Tab
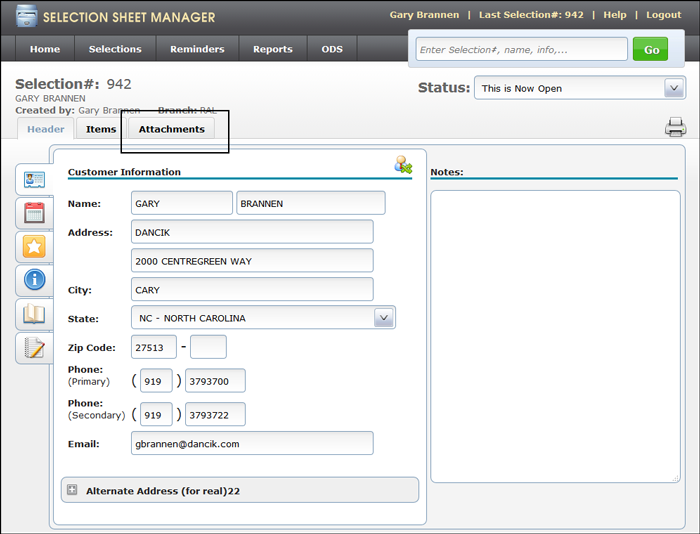
When the Attachments tab is clicked all the files uploaded for the selection sheet display.
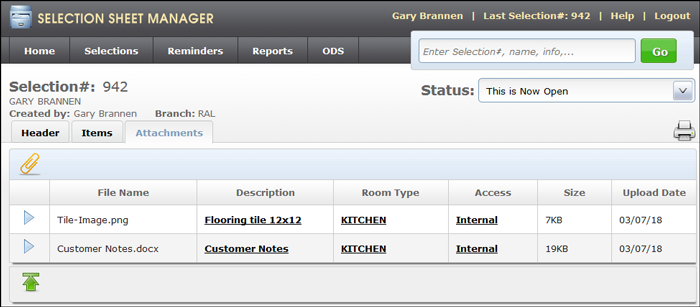
The Description, Room Type and Access fields are editable. Any changes are noted on the Selection Sheet Log (which is accessed via the  icon on the Selection Sheet header).
Internal attachments are not included on any customer facing communication; such as printed selection sheets; nor are they displayed on the items tab.
Click the  icon to the left of a file to display it's information.
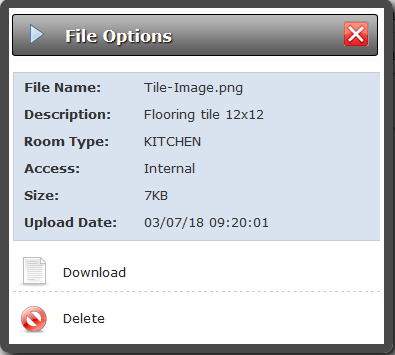
Items Tab
The paper clip icon on the Items tab provides the ability to upload attachments from the Items tab.
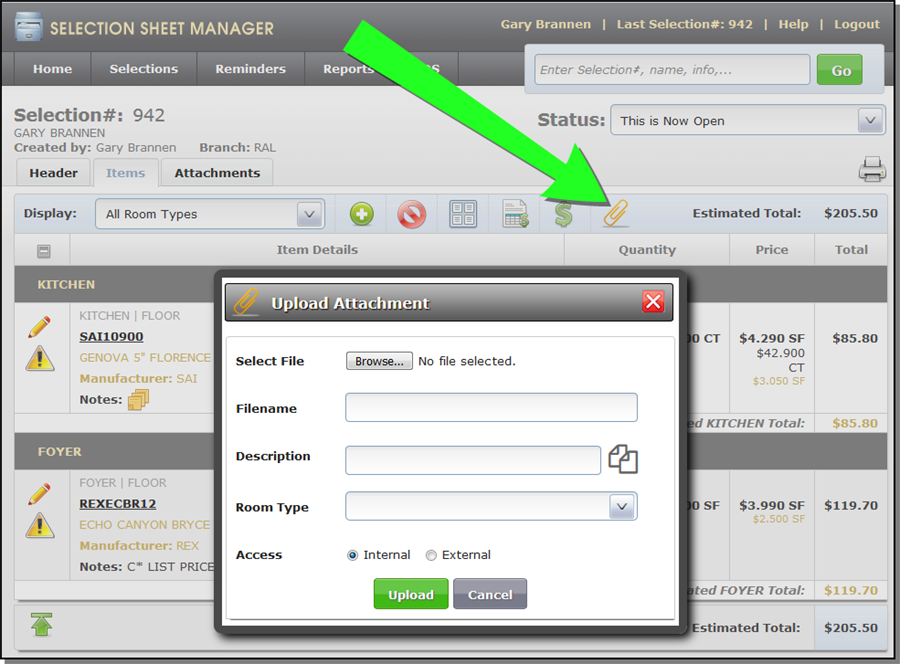
Enter a Description and then click the copy icon ( )to copy the description into the File Name. This allows you to attach mobile device photos, use the typed description as the file name. (ie: KitchenFloor.jpeg).
The attachments added here are included with items selected for the room type.
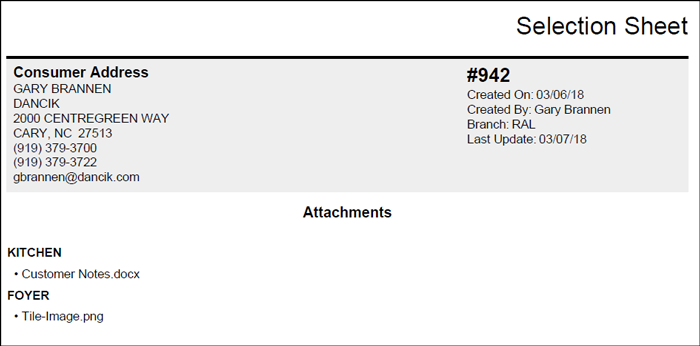
Including Attachments with Selection Sheets
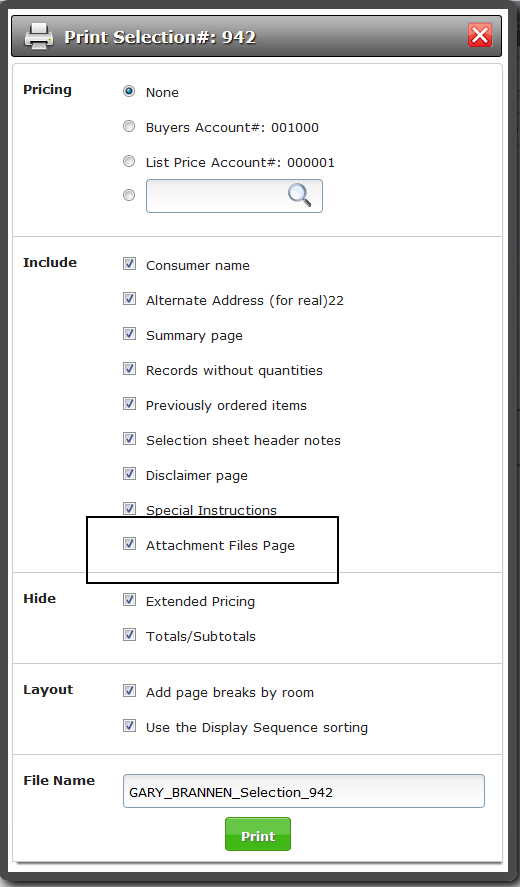
Printing
An option has been added to the Print options window that includes the attachment names included on the selection sheet.

Distributing Attachments
Attachments flagged as External can be included when the selection sheet is distributed.
You can Select All the attachments or click on individual ones to include.
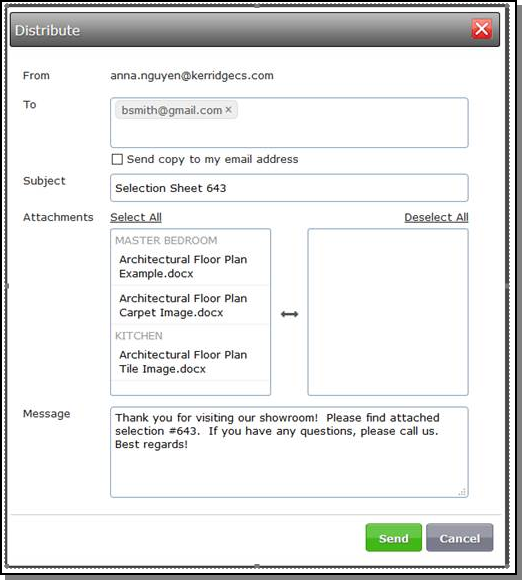
The Send copy to my email address CCs the current SSM user on the email that they are sending.
Associated Files
Selection Sheet Manager Activity Spreadsheet (SSM 30)
This X by Y report can be used to track showroom activity (across showroom or consultant). It can be filtered to show invoiced dollars and order dollar amounts (not yet invoiced) for orders pulled through SSM. The output for the report is a spreadsheet with calculated values.
An Attachment worksheet has been added that includes details of files attached to selections sheets included in the report.


 ) to change the customer. You can Search for an existing customer or add a New Customer to assign to the selection sheet.